
Documentation Locomotion Framework
Installation, getting started and full reference for the plugin.
The idea in two minutes
Locomotion Framework animates a third-person character: walking, running, stopping, turning around, jumping, climbing over an obstacle, drawing a weapon, aiming. You wire nothing: you file your animations into a grid, and the plugin picks the right one at the right moment.
The plugin is replicated: your characters stay in sync in multiplayer, host and client alike, with no extra network setup on your part.
The one idea to remember
The whole plugin fits in two grids, drawn the same way and read the same way: a cell is always where its row and its column meet, a click opens it, a right-click offers what can be done with it.
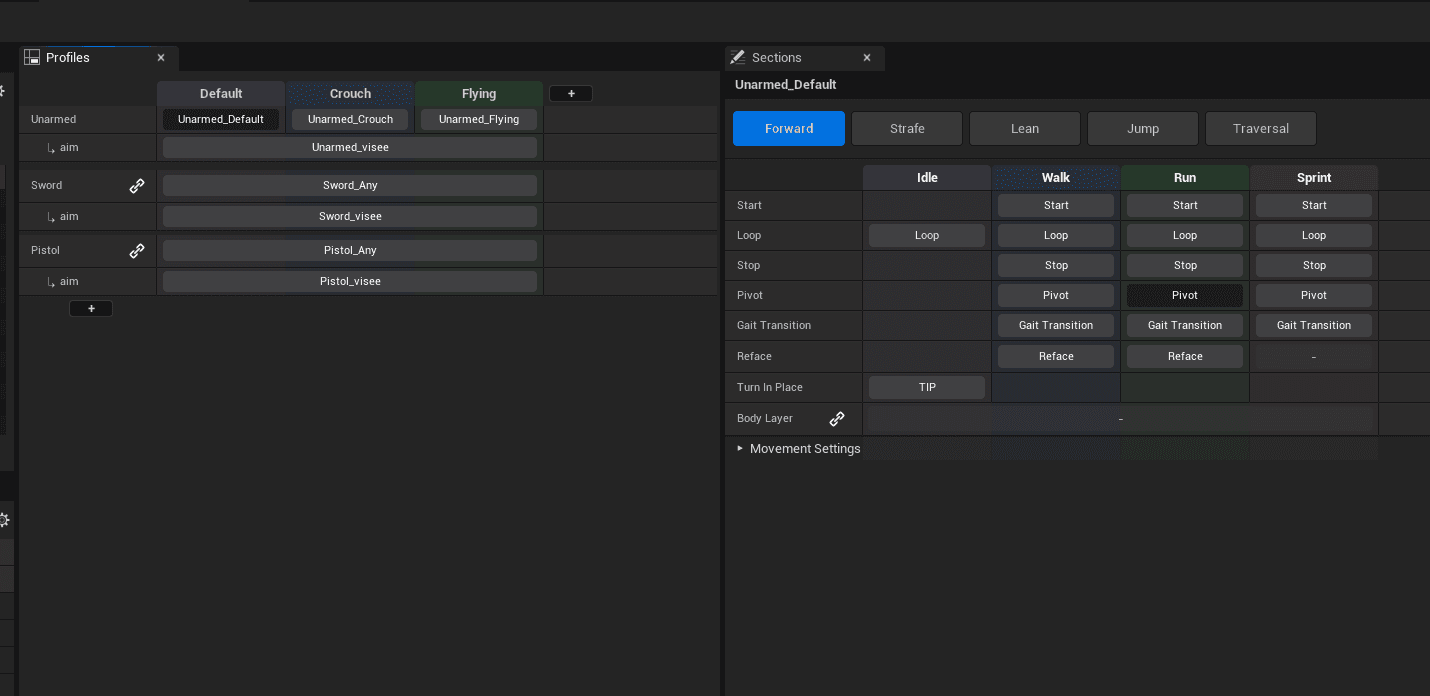
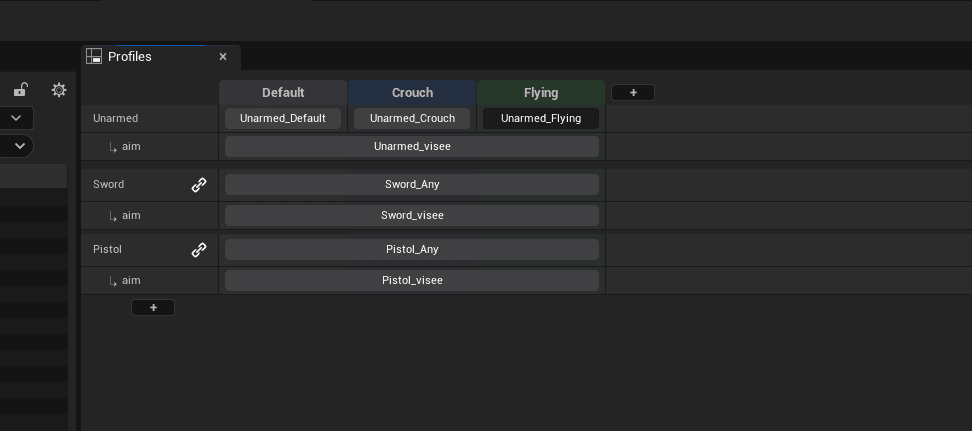
The first one says who your character is. One row per profile — bare hands, rifle, sword — and one column per state — standing, crouched. A cell is your character in that particular situation: the rifle while crouched.
The second one lives inside a profile and says what it plays. Columns are gaits — Idle, Walk, Run, Sprint. Rows are moments — the cycle, the start, the stop, the turn. A cell is, here again, where the two meet: “what my character plays when it is running and comes to a stop”.
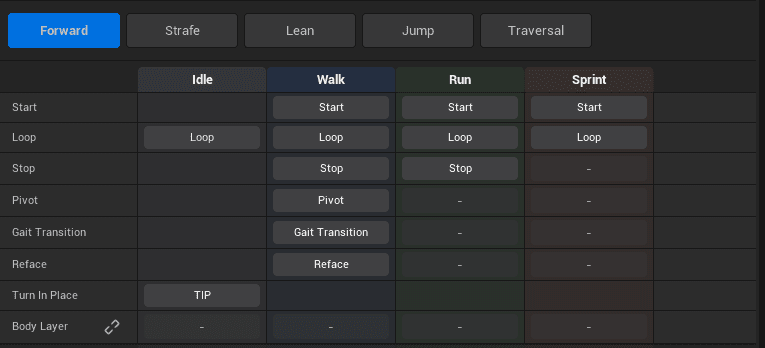
The second one is what you will open right away: a new character has a single profile, and as long as you add neither a weapon nor a posture the first table fits in one cell. You fill in the cells you need; an empty cell plays nothing and breaks nothing. That holds from the first page of this documentation to the last.
What you need
- Unreal Engine 5.8.
- A character: a Skeletal Mesh and its skeleton. No particular rig is required.
- Animations. At the very least an idle and a run cycle — the rest can be added whenever you want.
- No C++: the plugin ships compiled, a Blueprint project is enough.
Animations with root motion save you time: the plugin can derive speeds from them, land a stop at the right distance and drop a turn at the right moment. Everything works without root motion too, but you then set those values by hand.
Installing the plugin
- 1On the plugin’s FAB page, click “Add to My Library”. The plugin joins your Epic library.
- 2Open the Epic Games Launcher, Unreal Engine tab then Library. The plugin appears at the bottom, under “Vault”.
- 3Click “Install to Engine” and choose your Unreal Engine version.
- 4Open your project, then Edit ▸ Plugins. Look for Locomotion Framework and tick its box.
- 5The editor asks for a restart. Accept.
The plugin enables six others that it depends on — Enhanced Input, Editor Scripting Utilities, Animation Locomotion Library, Animation Warping, Motion Warping and Niagara. You have nothing to do, they are ticked along with it.
If the plugin is greyed out in the list, its version does not match the engine’s: reinstall it from the launcher, choosing the exact version of your project.
The plugin window
On restart, the Locomotion Framework window opens on its own: this is where character creation starts. You can reopen it at any time from the Tools ▸ Locomotion Framework menu, and the “Don’t open at startup” box in its banner stops it from coming back on launch.
Creating your character
This window builds the whole character in one click. Fill in five fields.
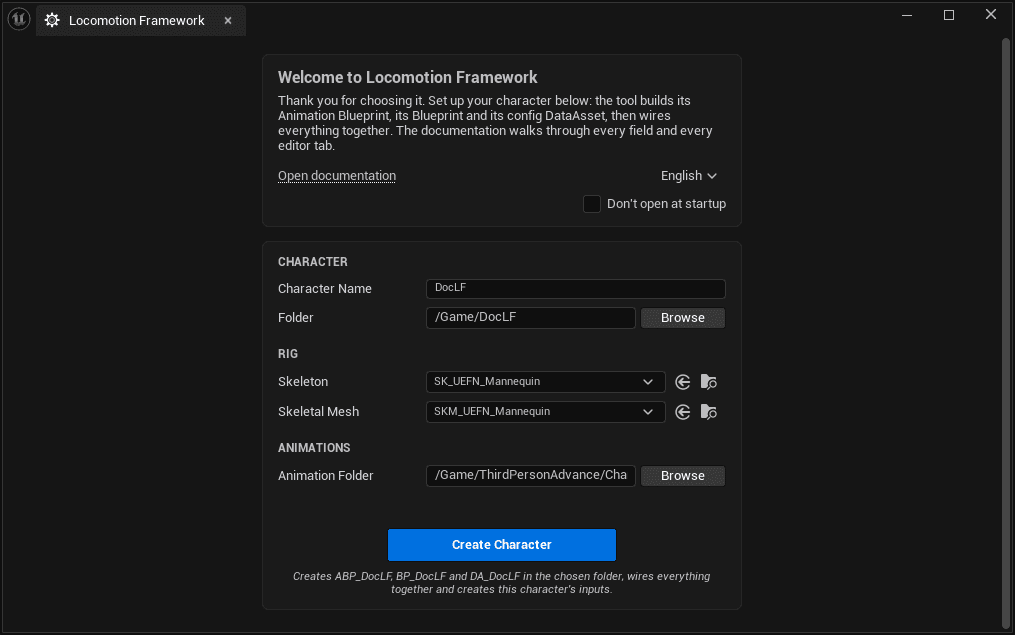
| Field | What it is for |
|---|---|
| Character Name | The base name. The plugin derives three assets from it: ABP_<Name>, BP_<Name> and DA_<Name>. |
| Folder | The folder where everything will be created. |
| Skeleton | Your character’s skeleton. |
| Skeletal Mesh | The mesh the character will wear. |
| Animation Folder | The folder where your animations live. The configuration editor will open its content browser straight onto it — you will not have to hunt for it on every clip. |
The Create Character button stays greyed out as long as a folder, a skeleton or a mesh is missing; the line under the button says which one. Once clicked, the form empties itself: that is the sign the creation succeeded.
The five things created
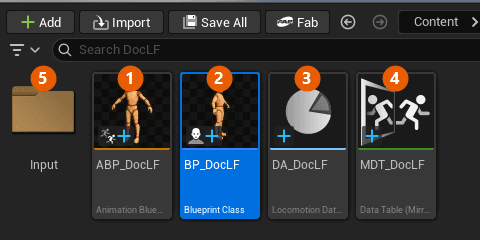
| Asset | What it is |
|---|---|
| ① ABP_<Name> | The Animation Blueprint. It holds a single node, LF Locomotion Framework, plugged into the output pose. All the locomotion is inside it. |
| ② BP_<Name> | The character to drop into the level. Mesh, Animation Blueprint and configuration are already wired together. |
| ③ DA_<Name> | The configuration. This is the only asset you will really edit. It comes out empty. |
| ④ MDT_<Name> | The mirror table: it states which left bone matches which right bone. Built for your skeleton and wired automatically. |
| ⑤ Input/ | The key mapping and the character’s eight actions — movement, camera, walk, sprint, strafe, jump, aim, equip. These are your own copies: remap them freely. |
The Animation Blueprint holds a single node, but nothing stops you from adding more after it: a Foot Placement, a Control Rig, your own nodes.
The configuration editor
Double-click your DataAsset. It opens on an editor made of five panels, all movable and closable like any Unreal tab.
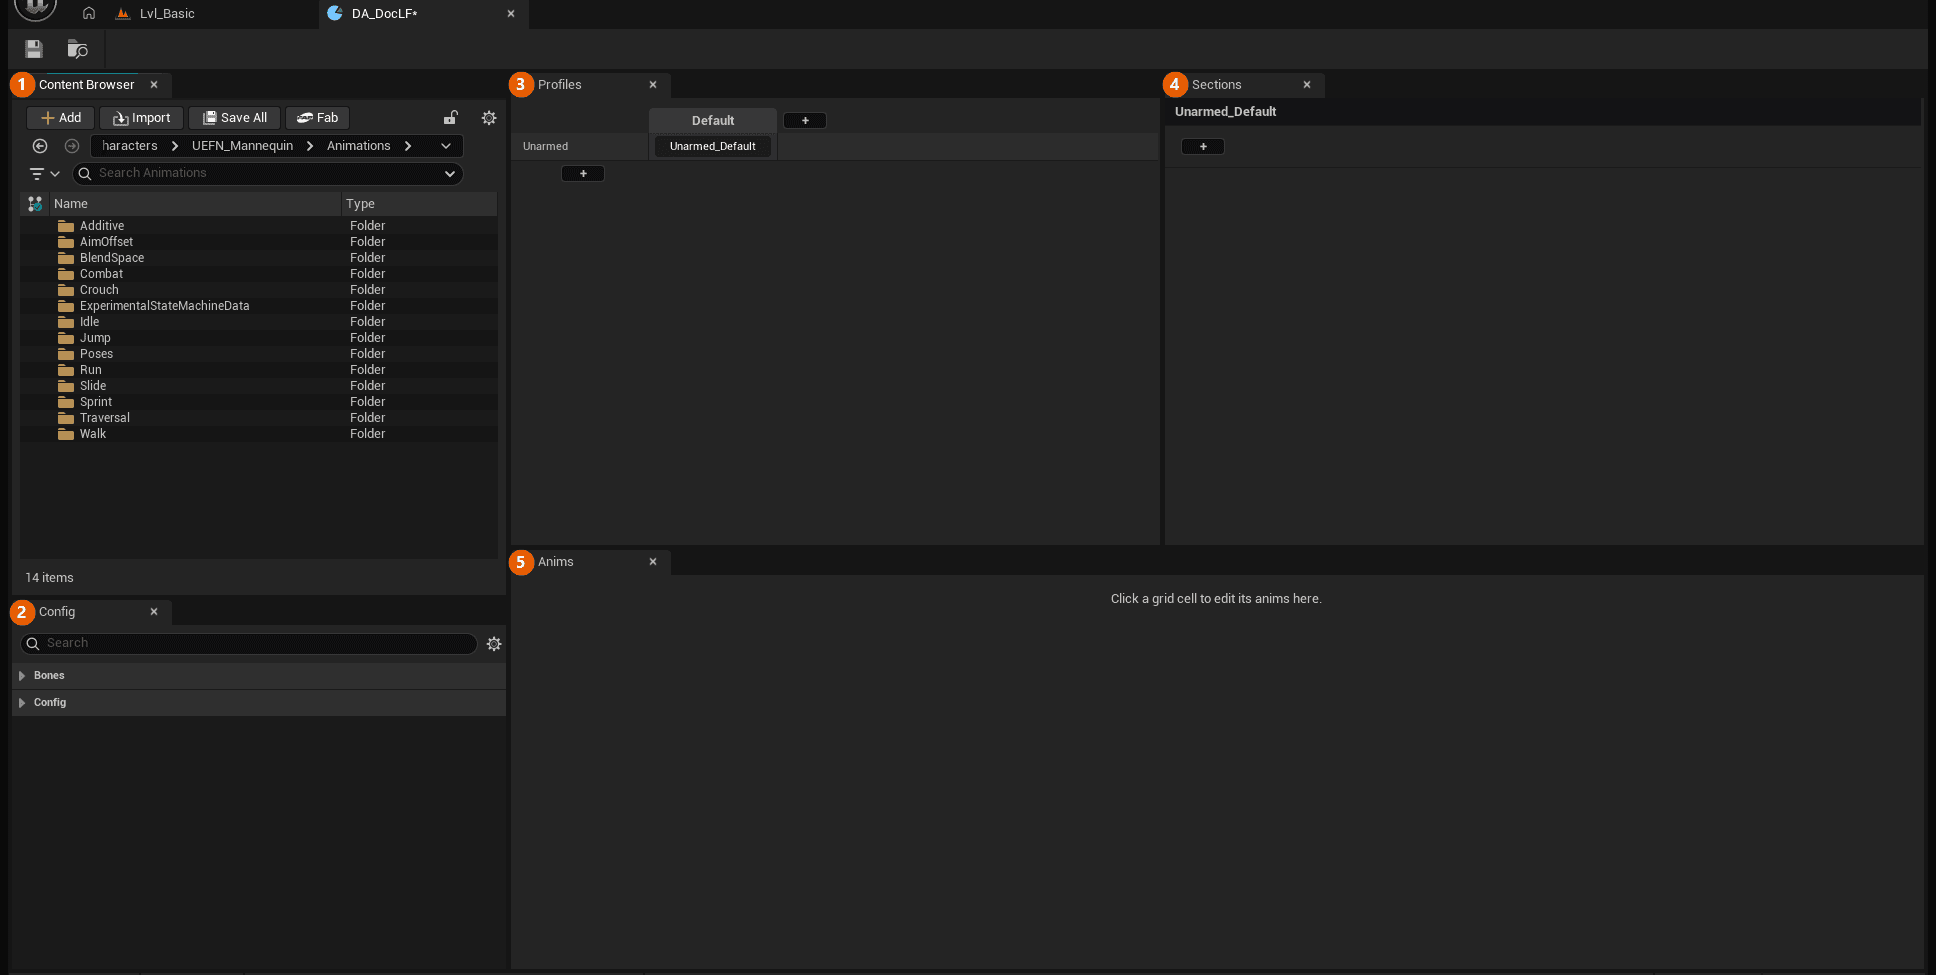
| Panel | What it holds |
|---|---|
| ① Content Browser | A built-in content browser, already opened on your animation folder. You pick your clips there without leaving the window. |
| ② Config | The settings shared by the whole character: the bones used, mirroring, debugging, blends. They depend neither on a weapon nor on a stance. |
| ③ Profiles | The table of character variants: one row per weapon, one column per stance. A fresh character only has one, Unarmed_Default. |
| ④ Sections | The families of movement — going forward, strafing, jumping, traversing. This is where you will spend most of your time. |
| ⑤ Anims | The contents of the cell selected in the grid. As long as you have clicked no cell, it stays empty. |
Profiles: a variant of the character
A profile is your character in a given state: empty-handed, holding a rifle, crouched, aiming. The Profiles panel is a two-way table: one row per weapon, one column per stance.
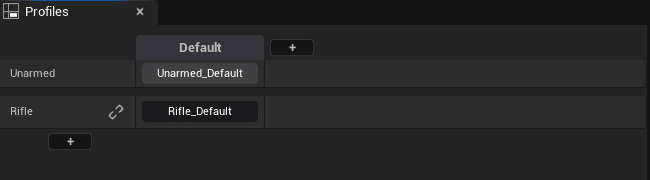
- The + on the left adds a row, so a weapon.
- The + on top adds a column, so a stance.
- Clicking a cell opens that profile: the rest of the window starts talking about it.
- Right-clicking a cell renames, copies, pastes or deletes it.
A simple character has a single profile and you will never touch it. Weapons and aiming come much later in this documentation.
Sections: adding a family of movements
A fresh character can play nothing: it has no section. You add the ones you need, one at a time. The + button in the Sections panel opens the list of what is missing.
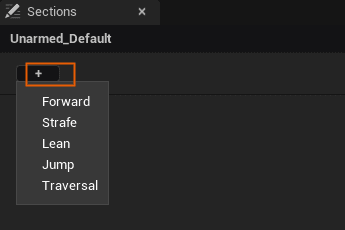
| Section | What it brings |
|---|---|
| Forward | Moving in the direction the character is facing. The basis of everything. |
| Strafe | Moving in one direction while looking somewhere else. |
| Lean | The body leaning into turns. |
| Jump | The jump: take-off, fall, landing. |
| Traversal | Getting past an obstacle: mantling, climbing, vaulting, catching on. |
| Equip | Drawing and holstering. Only appears on a weapon profile. |
The menu only shows the sections that are missing, and only those that make sense for this profile — a profile without a weapon is never offered Equip, a weapon profile is never offered Lean. A section already added is gone from the list: its tab replaces it.
Start with Forward. Removing a section later erases nothing: its animations stay in the asset and come back if you add it again.
Cells: making them play
A new cell is not active. It shows a dash, and it will play nothing until you tell it what to do. The right-click menu decides that.
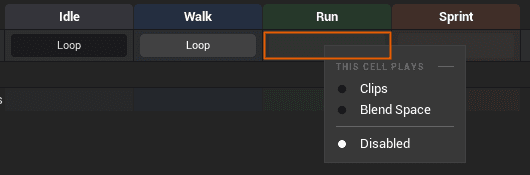
| Mode | What the cell plays |
|---|---|
| Clips | The animations you drop into it, one by one. The normal case. |
| Blend Space | A blend space that blends directions and speeds on its own. A single asset instead of several clips. |
| Additive | A jolt added on top of what is already playing, instead of a full animation. Offered on starts and stops. |
| Disabled | The cell is switched off in game. Its settings are kept: this is a switch, not a deletion. |
The modes on offer change with the row: a cycle offers Clips or Blend Space, a start offers Clips or Additive. Read the menu rather than counting positions.
The same right-click also lets you switch off a whole column or a whole row: “Disable” takes it out of the game without erasing anything, “Delete” removes it from the grid — and its animations come back if you add it again.
Erasing nothing means freeing nothing: a switched-off cell, a deleted row or column keep their animations in the asset, and those clips are loaded into memory along with the profile. They play nothing but still take up the space. That is what makes cutting so handy while you are still experimenting; before packaging your game, empty the slots you no longer want.
The Anims panel: placing animations
Click an active cell. The Anims panel shows its contents.
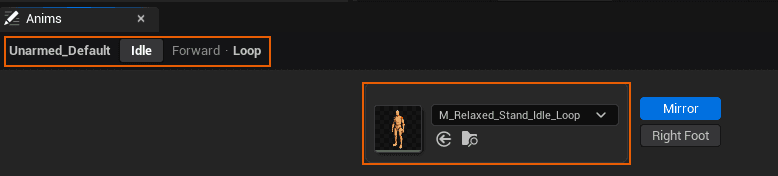
The breadcrumb
The top line gives the exact address of what you are editing: the profile, the gait, the section, the state. The grid fills up quickly; this is the only thing that removes the ambiguity.
A cell holds several slots
Almost never a single animation. A start has six — three directions, two feet. A strafe cycle has eight. Idle, on the other hand, has just one. The panel lays them out like a compass: the top card is forward, the bottom ones are backward.
Three ways to fill a slot
- Drag the clip from the content browser onto the field.
- Open the dropdown and search for it by name.
- Select it in the browser, then click the arrow to the left of the field: it grabs the selected asset.
Start Position
Many slots have a Start Position field: the point in the clip, in seconds, where playback begins. It is useful when your animation opens with a wind-up you do not want to play again.
The link button
Between two foot slots sits a small link-shaped button. Closed, a single clip plays whichever foot leads. Open, each foot has its own. Click it if your animation only exists on one side.
You can also fill only one foot and leave the other empty, provided Auto-Mirror Missing is enabled in the Config panel: the plugin then plays the existing clip mirrored. For that it needs the mirror table, which creation already wired up.
Gaits and their speeds
The + to the right of the columns adds a gait: Walk, Run or Sprint. Each becomes a column, with its Loop row to fill in — the walk cycle in Walk, the run cycle in Run, the sprint cycle in Sprint.
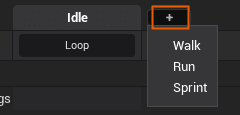
None of them is mandatory: a character that only ever walks needs Walk and nothing else.
Movement Settings
An animation is not enough: the character also has to be told how fast it moves, otherwise the feet slide. The Movement Settings pane, below the grid, holds one column per gait.
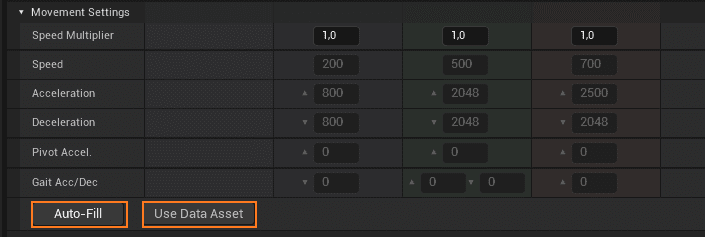
| Setting | What it does |
|---|---|
| Speed Multiplier | Speeds the gait up or slows it down, animation included. 1.2 to go 20% faster without the feet sliding. |
| Speed | The movement speed of this gait. |
| Acceleration | How briskly the character reaches that speed. |
| Deceleration | How briskly it comes to a stop. |
| Pivot Accel. | Acceleration during a turn, usually brisker than a start. At 0, the normal acceleration applies. |
| Gait Acc/Dec | How brisk the character is when he changes gait. ▲ = he speeds up into this gait, ▼ = he slows down into it. At 0, the Acceleration and Deceleration above are used. |
Walk only has a ▼ and Sprint only a ▲: you can only slow down into a walk, and only speed up into a sprint. Run has both. Why a separate value? Without it, going from run to walk uses Deceleration — the one tuned for a full stop, often too harsh for a mere gait change. The row only shows if the profile has at least two gaits.
Auto-Fill: letting the plugin measure
The Auto-Fill button reads your animations and fills Speed, Acceleration and Deceleration on its own. Here is exactly what it measures:
- Speed — the Loop clip’s displacement divided by its duration. That is the speed the animation actually carries.
- Acceleration — how long the Start clip takes to reach that speed. It isolates the ramp-up, not the clip’s total length.
- Deceleration — the same measurement, in reverse, on the Stop clip.
Auto-Fill only works if your animations have root motion: it is the root’s displacement that it measures. Without root motion it writes nothing. In that case, tick Use Data Asset and enter the values by hand.
You can change these values during a running game (PIE) and see the effect immediately: no recompilation is needed.
The Strafe tab has its own Movement Settings, and its Auto-Fill measures the strafe clips — not the Forward ones. The two sets of animations share neither speed nor braking, so a single shared value would be wrong.
Forward: moving ahead
Forward is the base locomotion: the character moves in the direction it is facing. It is the only section that can never be switched off; every other one grafts onto it.
The + below the last row adds a state. Seven are available, and the following pages take them one at a time.
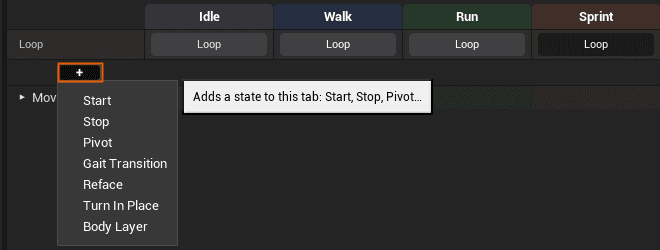
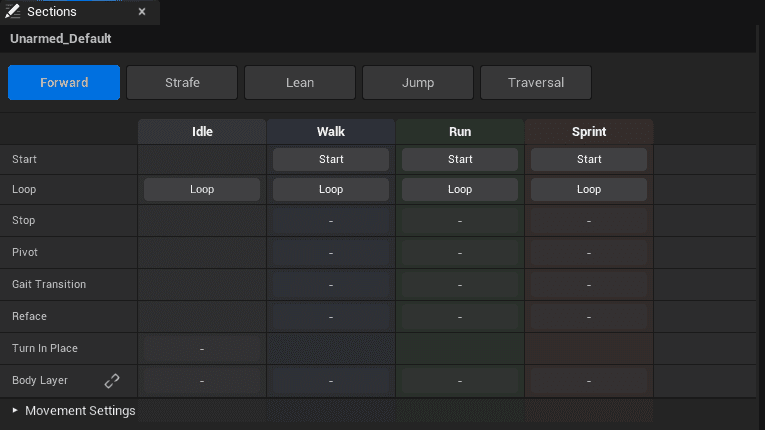
| State | When it plays |
|---|---|
| Loop | The cycle, while the character moves at this gait. |
| Start | The start, when it sets off from standing still. |
| Stop | The stop, when it comes back to a standstill. |
| Pivot | The turn at full speed, when it heads back the other way. |
| Gait Transition | Moving from one gait to another, from walking to running for instance. |
| Reface | Switching between running straight ahead and moving while looking elsewhere. |
| Turn In Place | Turning on the spot, at a standstill. |
| Body Layer | A layer added on top of everything else — breathing, fatigue, injury. |
Idle
Idle is the Idle column of the Loop row: what the character plays when it does nothing. A single slot, a single animation — the same clip whichever foot the character has just come to a halt on.
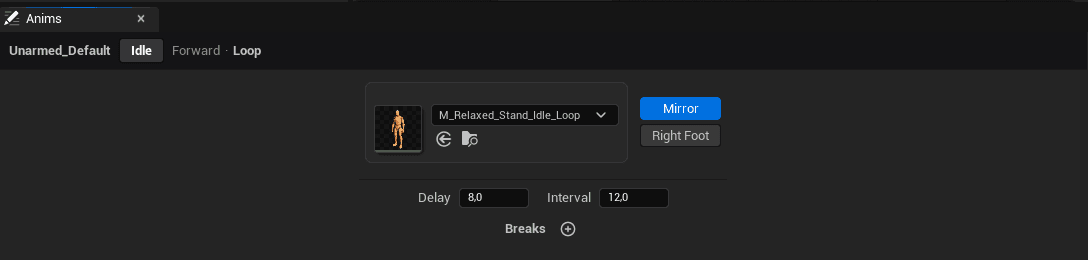
Mirror and Right Foot
| Button | What it does |
|---|---|
| Mirror | Plays Idle mirrored when the right foot leads: the same clip serves both sides. The breaks and the straight-ahead start follow this setting. Mirroring needs the asset’s mirror table. |
| Right Foot | Says which foot is in front in your clip: on, it is the right one — and that is the side the mirroring starts from. The button stays greyed out as long as Mirror is off. |
Breaks
A character breathing in a loop for thirty seconds shows. Breaks are small living animations — it looks around, stretches, checks its weapon — played every now and then between two turns of the idle. The + under the slot adds as many as you want: nothing to set per clip, there is only the animation. The plugin picks one at random, never playing the same one twice in a row, and cuts it as soon as the player moves.
| Setting | What it does |
|---|---|
| Delay | How long it stands still before the first break. |
| Interval | How long between two breaks. The first one waits for the Delay. |
A break has to start and end on the idle pose: that is where the plugin picks it back up. A clip that ends elsewhere shows as a jolt on the way back. Leave the list empty and there simply are no breaks — nothing to untick.
Start
Without a start clip, the character jumps from standing still straight into its run cycle: it slides through the first steps. The start replaces that moment with a real set-off.
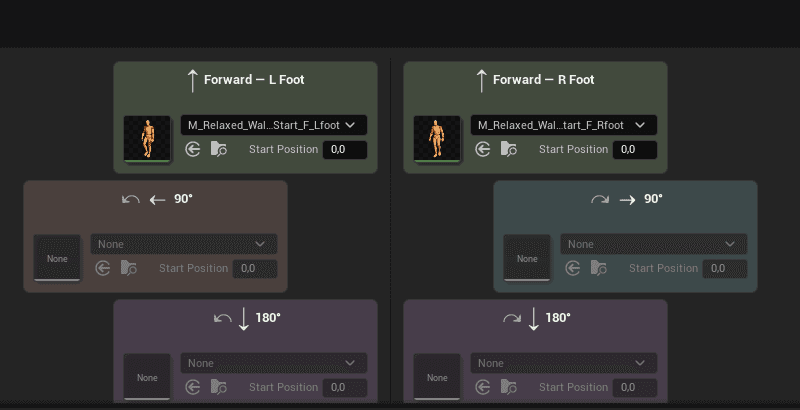
Six slots, laid out like a compass seen from above:
- Forward — L Foot and Forward — R Foot: setting off straight ahead, on the left or the right foot.
- 90° left and 90° right: setting off sideways, the quarter turn being inside the clip.
- 180° on both sides: setting off backwards, half turn included.
Which of the two Forward starts plays depends on Idle’s Mirror button. Mirror on: the standing pose really follows the stop foot, so the character sets off on the foot it had stopped on. Mirror off: the pose is the same on both sides, and the direction the player pushes decides — to the left the left-foot start, to the right the right-foot start. The 90° and 180° starts are not concerned: what they describe is a side, not a foot.
Every slot has its own Start Position. Filling in the two Forward starts is enough to feel the difference; empty directions play nothing wrong, the character simply sets off with its cycle.
Right-clicking a start cell also offers Additive: instead of a full animation, a jolt added on top of the cycle. Useful when you have no real start clips but want to break the softness of setting off.
Stop
Two slots only: one clip per foot, with its Start Position. The plugin picks according to the foot the character was running on when you released the input.
A stop ends on one foot — the left or the right — and it is the pose of that stop clip that gives Idle its foot. Idle has a single slot: with Mirror, it plays mirrored when the leading foot is not the clip’s one; without it, it plays as it is on both sides.

Landing in the right place
A stop must end where the character comes to rest, not two steps further on. The plugin manages this by reading the clip’s displacement: it enters the clip at the moment matching the distance still to cover.
If your clips have no root motion, tick Use Distance Curve in the Config panel and give the curve’s name in Distance Curve Name: the plugin will then read the remaining distance from that curve in your animations rather than from their movement. It is in centimetres and negative — the distance still to cover — crossing zero at the moment the character comes to rest.
Same rule as for the turn: a Start Position above 0 on the cell wins over the automatic alignment. Leave it at 0 so the plugin picks its own entry point.
| Setting (Config) | What it does |
|---|---|
| Stop Handoff Distance | Over the last few centimetres before the stop, the clip finishes on its own instead of being synced to the distance left — otherwise the end shakes. 5 cm by default: raise it if the end trembles, lower it if the feet slide. |
| Use Distance Curve | Reads the remaining distance from a curve in your clips rather than from their movement. |
| Distance Curve Name | The name of that curve in your clips. |
Pivot: the about-turn
The pivot is the about-turn at full speed. Without it, a character in full stride asked to head back the other way spins on itself while keeping its run cycle — and it slides.
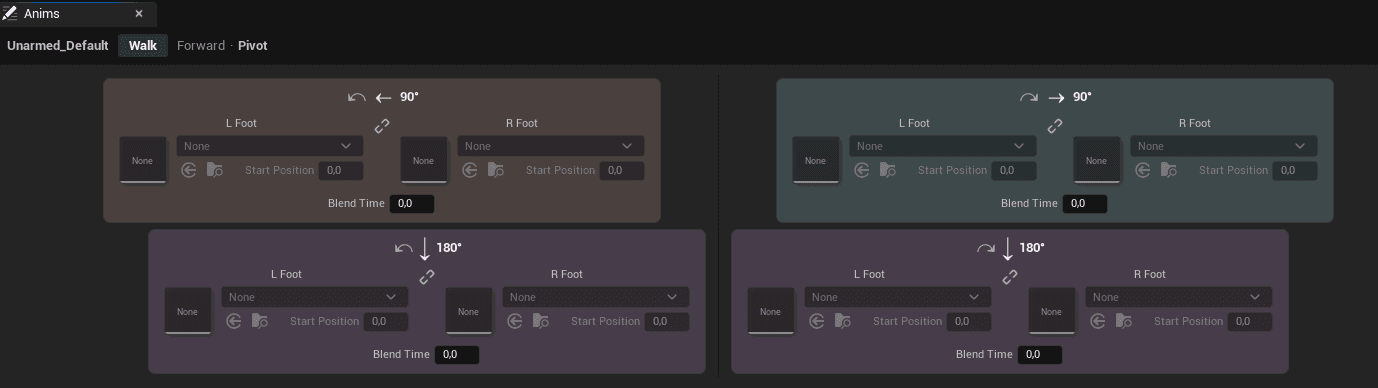
Four cards — 90° left, 90° right, 180° left, 180° right — each with one slot per foot, its link button and its Start Position.
The 180° aligns itself
A full about-turn goes through a slow-down: the plugin uses it as an anchor. It reads the clip’s displacement, spots the plant — the instant the foot lands and the movement reverses — and enters the animation just in time for that plant to land in the right place.
If the clip has no root motion, give it a distance curve and put its name in Config ▸ Distance Curve Name. It must be in centimetres, negative before the plant, and cross zero at the moment of the plant. A curve that already reads zero at the start is ignored: it describes no approach.
With neither root motion nor a curve, the plugin falls back on Pivot Start Position 180, adjustable per gait in the Config panel: the clip then enters at a fixed instant that you tune by eye.
⚠ Leave the cell’s Start Position at 0 if you want that automatic alignment. As soon as it is above 0, your value wins: the plugin enters the clip at that precise instant and aligns nothing any more, neither on root motion nor on the curve. This is the most common cause of a 180° that never lands right.
The 90° is tuned by hand
A quarter turn happens without slowing down: the character keeps its speed, so there is no deceleration to align on. The plugin does not try to re-time it — it enters the clip at the cell’s Start Position and plays it freely.
So that Start Position decides everything: raise it for the foot to plant earlier, lower it to leave more momentum. Tune it by eye, once per clip.
The 90° set is not only for turns of exactly 90°: it covers anything beyond Pivot Trigger Angle that falls short of a full about-turn. The same clip therefore plays for a 60° turn and for a 130° one — set the Start Position for the angle most common in your game.
Blend Time
Under each pair of cells, Blend Time gives the length of the blend into that pivot clip. One value per card — 90° left, 90° right, 180° left, 180° right — because both feet of the same about-turn come in the same way. In strafe, every direction of the compass has its own.
At 0 the cell imposes nothing: the profile’s Phase Blend Time is used. The Blend Time that applies is the one of the cell ACTUALLY played — if a 90° left empty falls back on the 180°, it is the 180°’s Blend Time that counts.
| Setting (Config) | What it does |
|---|---|
| Pivot Trigger Angle | The angle beyond which a turn becomes a real played about-turn. |
| Pivot Handoff Distance | The same for the turn: over the last centimetres of braking, the pivot clip finishes on its own. 10 cm by default, since a pivot hands over earlier. |
| Pivot Reentry Unlock Progress | How far into the turn a second one can follow on the same side. Raise it if the character pivots again too early. |
| Pivot Start Position 180 | The 180°’s last resort, per gait: used only when the clip has neither root motion nor a distance curve. |
Gait Transition
Without this state, moving from walking to running swaps the two cycles with a cross-fade: the character has not accelerated, it has changed animation. A linking clip makes the change real.
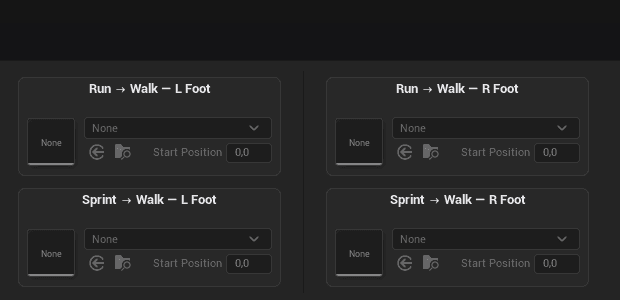
The cards carry the direction of the transition — Run → Walk, Sprint → Walk. The column you are in is the destination gait: the Walk column therefore holds everything that leads into walking. Two slots per transition, depending on the foot it lands on.
Reface: reorienting while moving
Reface plays the switch between running straight ahead and moving while looking elsewhere — and back. Without it, the torso swings round in one block.
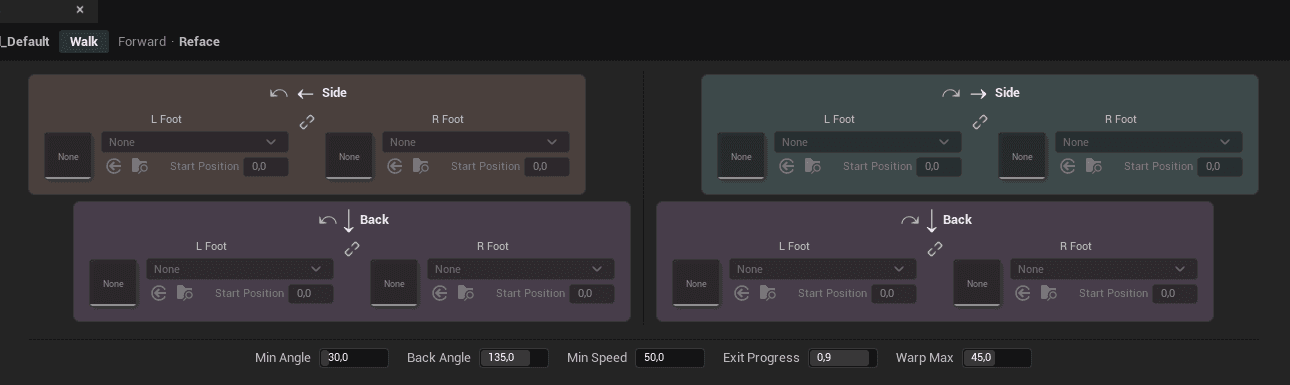
Four directions — left side, right side, back left, back right — each per foot. The bottom row tunes the trigger:
| Setting | What it does |
|---|---|
| Min Angle | The angular gap from which a reorientation is played. |
| Back Angle | The angle beyond which the “back” version plays rather than the side one. |
| Min Speed | The speed above which the character counts as moving. |
| Exit Progress | How far into the clip another reorientation may take over. |
| Warp Max | The maximum rotation the plugin adds to the clip to cover the exact angle, in degrees. |
Turn In Place
At a standstill, no movement hides a rotation: without an animation, the character turns like a statue on its base. Turn In Place plays a real turning step. This row only has a cell under Idle — it is the only place where it means anything.
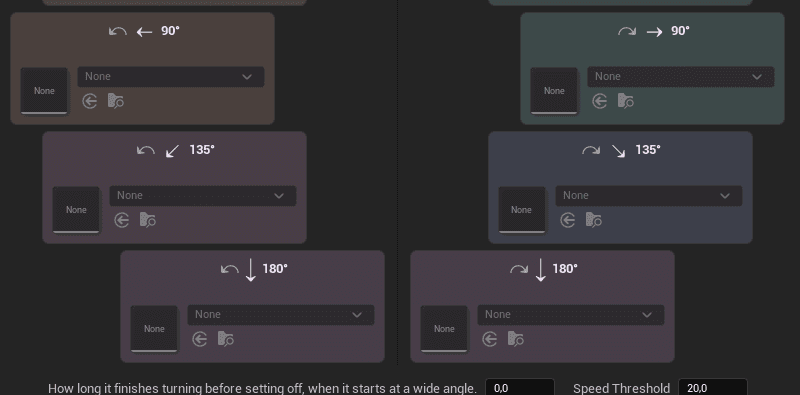
Four angle steps — 45°, 90°, 135°, 180° — left and right. The plugin picks the step closest to the gap to make up.
You do not have to fill in all four: an empty step falls back on the nearest one that is filled. A single 90° clip on each side already gives a decent result.
| Setting | What it does |
|---|---|
| Speed Threshold | Below this speed, the character counts as standing still and may trigger a turn on the spot. |
| Finish time | How long it finishes its rotation before setting off, when it starts from a wide angle. At 0, it leaves immediately. |
Strafe: moving without turning
While strafing, the character keeps its facing — towards the camera, towards a target — and moves in another direction. The section reuses the same states as Forward: Loop, Start, Stop, Pivot, Reface.
The big difference is the number of animations: a strafe cycle is not a single clip, you need one per direction. The panel lays them out as a compass.
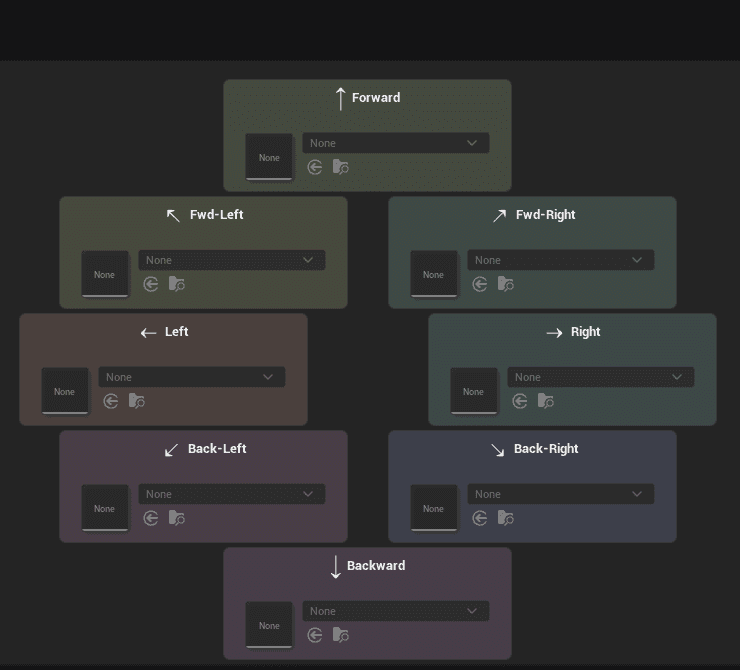
Eight directions: forward, forward-left, forward-right, left, right, back-left, back-right, backward.
Yaw Warp: covering the angles in between
Eight directions do not cover 360°: a gap remains between two clips. Yaw warp turns the mesh slightly to fill that gap, rather than asking you for sixteen animations.

| Setting | What it does |
|---|---|
| Yaw Warp | Enables the correction. Unticked, only the eight authored directions play. |
| Max | How far that rotation goes, in degrees. Half an octant is 22.5°: beyond that, the twist shows. |
| Speed | How smoothly one direction gives way to the next. |
The idle is not duplicated: the strafe’s Idle column points at the same animation as Forward’s. A character only has one idle.
Lean: leaning into turns
Lean tilts the character while it turns, like a cyclist in a bend. It is the only section without a grid: it does not depend on the gait, its settings apply to all four at once.
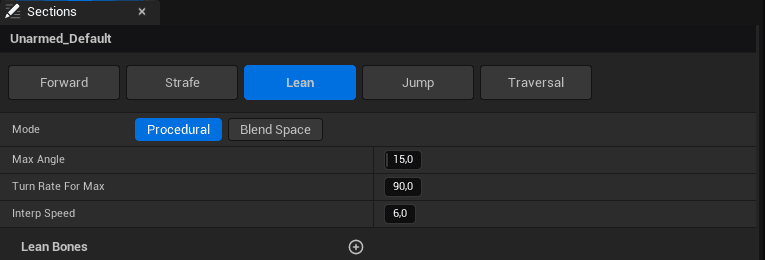
The Mode row, at the top, picks between two ways of getting that tilt: Procedural or Blend Space. They exclude each other, and one is always active — the tab opens on Procedural.
Procedural: the plugin tilts the bones
No animation to supply. The plugin computes an angle — the faster the character turns and the faster it moves, the larger it gets, capped at Max Angle — then applies it itself to the bones you list in Lean Bones, each with its axis and its share of the angle. With an empty list, it falls back on spine_01 and neck_01.
Blend Space: the tilt comes from your animations
This mode replaces the bones with a slot: Lean Blend Space expects an additive 2D blend space, added on top of the locomotion pose. The plugin samples it on its own — X is the turn (−1 left, +1 right), Y the acceleration (−1 braking, +1 accelerating) — you have nothing to wire. Max Angle and Lean Bones disappear: your blend space decides the pose.
| Setting | What it does |
|---|---|
| Max Angle | Procedural only. The maximum tilt, in degrees. 15 is a good starting point. |
| Lean Bones | Procedural only. The bones that lean, each with its axis and its weight. Spreading the angle along the spine does not give the same result as putting it all on one bone. |
| Lean Blend Space | Blend Space only. The additive blend space that carries the tilt. |
| Turn Rate For Max | Both modes. The turn rate, in degrees per second, from which the tilt is at full. Lower it and the character already leans in gentle bends. |
| Turn Dead Zone | Procedural only. How far off its recent path the character must go before it starts leaning, in degrees. A quick left-right swings around that path, so it no longer leans. 0 removes the threshold. |
| Interp Speed | Both modes. How smoothly it leans in and straightens up. |
| Reference Speed | Both modes. The speed at which lean has full authority; below it, the lean shrinks with speed. The field only appears if the character does not take its speeds from the DataAsset — otherwise the fastest gait is the reference. |
Start with Procedural: it needs no animation and is enough in most cases. Blend Space earns its keep when you want a real leaning pose — chest, arms, head — rather than a bone rotation.
Jump: leaping
Three moments, on three rows.
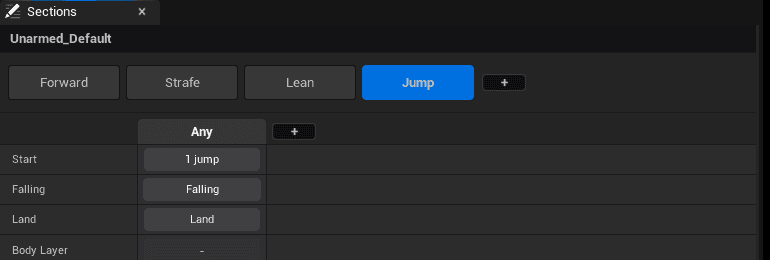
- Start — the take-off.
- Falling — the top of the jump, then the loop played on the way down.
- Land — the landing.
Any, or one column per gait
By default the jump has a single column, Any: one animation, whatever the character’s speed. The + on the right adds gait columns if you want a different take-off when walking, running and sprinting.
This is also how you restrict the jump. If you only want a character to be able to jump while running, add the columns and switch off the walk and sprint ones with a right-click: they keep their animations but no longer play.
The jump chain
The Start cell does not read “Start” but “1 jump”: a character can have several jumps chaining into each other — a jump, then a double jump, then a third. The order in the list decides which one plays.
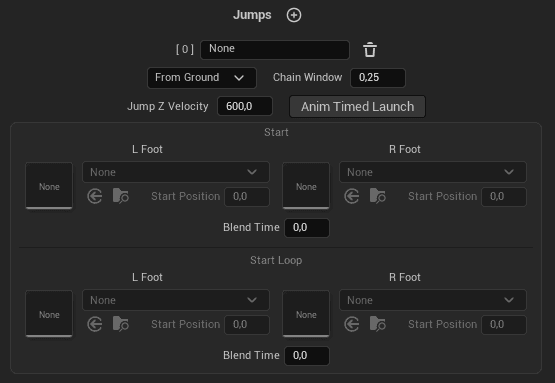
| Setting | What it does |
|---|---|
| Name | The jump’s name — “High jump”, “Double jump”. Used to find it in the list. |
| From Ground / In Air / None | Where this jump starts from: the ground, or mid-air to chain onto the previous one. None keeps it configured but out of the chain. |
| Chain Window | How long after landing this jump can still be chained. Past that delay, the next press starts again from the first. |
| Jump Z Velocity | The height of this jump, at this gait. |
| Anim Timed Launch | The jump takes off when the animation leaves the ground, not when the button is pressed. The character gathers momentum before going. |
| Takeoff Curve | The name of a curve on your clip that says which frame the character leaves the ground (0 = grounded, above 0 = airborne). Without it, the plugin guesses this moment from the clip's root motion. |
Start Loop
The take-off has two moments in the same card: Start, the push, and Start Loop, the loop played while the character is still going up. It stops on its own at the top — there is no duration to set.
Leave Start Loop empty and nothing more happens: the jump goes straight from the take-off to the top. It is an optional moment, not a step forced on you.
Blend Time
Under each pair of cells, Blend Time gives the length of the blend into those animations. One value per pair: both feet of the same move come in the same way.
- Start and Start Loop, in the jump card.
- Apex and Falling Loop, in the Falling window.
- The landing, in the Land window — per gait, and per direction in strafe.
At 0 the cell imposes nothing: the profile’s Phase Blend Time is used. A value you set IS the setting — there is no box to tick.
Land Anticipation: entering the landing before contact
In Config, Jump Land Anticipation states at what height above the ground the landing begins, and it exists per gait. Without it the landing starts on contact: it always arrives late. With it, it starts in the air and the contact lands right.
Traversal: getting past an obstacle
Five movements, each on its own row.
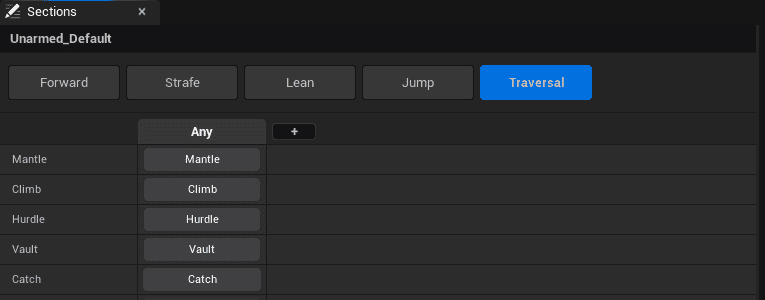
| Movement | What it is |
|---|---|
| Mantle | Pulling yourself onto a ledge and ending up standing on it. |
| Climb | Climbing a wall taller than you. |
| Hurdle | Clearing an obstacle over the top, without stopping. |
| Vault | Pushing off a low obstacle and landing on the other side. |
| Catch | Grabbing onto a ledge while falling. |
The panel of a movement
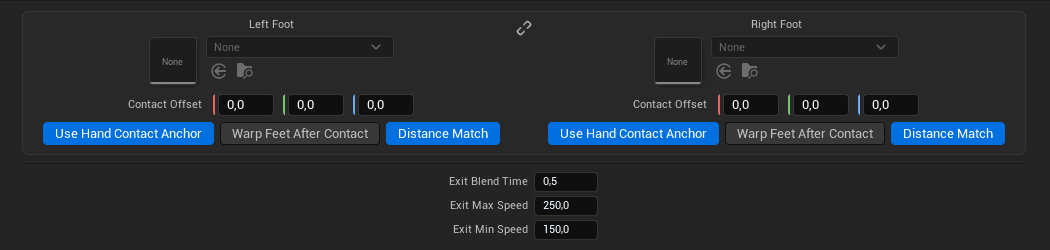
One montage per foot, and for each of them the settings that make the hands land in the right place:
| Setting | What it does |
|---|---|
| Montage | The montage played for this variant. Left empty, the character jumps instead of traversing. |
| Contact Offset | Offsets the point the hands aim for on the edge, in X, Y and Z. Useful when the hands consistently land too high or too short. |
| Use Hand Contact Anchor | Aligns the animation so the hands grab the edge exactly. |
| Warp Feet After Contact | After the grab, also aligns the feet on top of the obstacle. |
| Distance Match | Starts the montage at the point matching the remaining distance, so the character does not slide up to the obstacle. |
The two notifies to place on your montages
These settings assume the plugin knows two things about your montage: the frame where the hands touch the edge, and the frame where the move is over. It reads them from two notifies that you place yourself in the montage editor. Both are optional — without them the plugin guesses, less well.
| Notify | What it marks |
|---|---|
| Traversal Contact (Mantle Hand Plant) | The frame where the hands land on the edge. It serves two purposes: starting the montage at the instant whose remaining approach distance matches the real distance to the obstacle — the character covers the gap at its own speed, without sliding, and the warp then only makes up the height — and sampling the hand positions there, which become the targets of their IK. Without this notify, the montage always starts at the beginning and the correction is spread over the whole clip. |
| Traversal Recover (Mantle Exit Point) | The frame where the move is over and the pose is settled. Before it, the traversal cannot be interrupted; from it, control returns to the player and the tail of the montage — its walk-out or run-out — is replaced by real locomotion: with no input the character stops, with input it moves off, it can jump. Without this notify, the plugin guesses that point: the end of the climb for a mantle or a climb, the landing frame for a hurdle. |
Place the contact on the frame where the hands actually touch, not where they are reaching for it: that is the point that gets aligned with the edge. And place the recover on a clean pose — the blend into locomotion starts from there, so it reads exactly as it looks.
The exit
| Setting | What it does |
|---|---|
| Exit Blend Time | The length of the blend out of the movement. |
| Exit Max Speed | The maximum speed carried out of it. Lower it if the character shoots too far after traversing. |
| Exit Min Speed | The speed given on exit even from a standstill, so it does not stay stuck on the obstacle. |
You do not have to supply everything
Each movement exists per gait and per foot, but two fallbacks avoid pointless work: an empty sprint cell reuses the run one, an empty standstill cell reuses the walk one. Start with the run clips.
| Setting (Config) | What it does |
|---|---|
| Move Speed Threshold | Above this speed, the character uses its moving clips rather than its standing ones. |
| Forward Trace Distance | How far ahead it looks for a wall, in centimetres. |
| Catch Approach Speed | The minimum speed towards the wall needed to grab on: you must be heading for the ledge, not skirting it. |
| Catch Max Rise Speed | The maximum vertical speed allowed to grab on: you catch on while coming down, not while going up. |
| Hurdle Max Land Drop | The drop accepted on the other side. Beyond that, the character does not go. |
Weapons
A weapon is not an animation, it is a profile. Add a row in the Profiles panel, name it, and a cell appears where the weapon and the stance meet.
Right-clicking that cell carries the most important decision in the system:
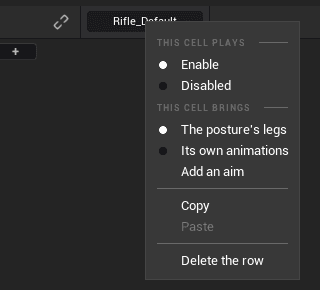
| Option | What it does |
|---|---|
| The posture's legs | The weapon only brings poses. The legs, the starts, the stops, all of the movement stays that of the unarmed row. This is the default setting, and the right one in most cases: a weapon changes the upper body, not the way you walk. |
| Block traversal while equipped | Cuts off mantle, climb, vault and catch while this weapon is equipped — useful for a two-handed weapon or a carried object. Only shows under The posture's legs: a weapon with its own animations already decides Traversal in its own grid. |
| Its own animations | The weapon plays its own movement animations. Keep this for weapons that genuinely change the gait. |
| Add an aim | Creates this weapon’s aiming pose, on a sub-row. |
| Enable / Disabled | Switches the cell off in game without erasing anything. |
Equip: drawing and holstering
On a weapon profile, the section menu offers Equip — and no longer offers Lean.
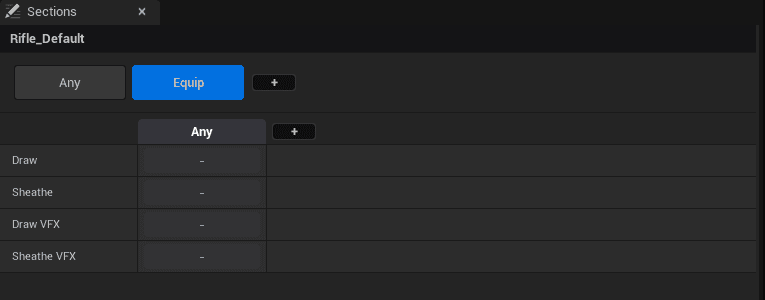
- Draw — the montage played to draw.
- Sheathe — the one to holster.
- Draw VFX and Sheathe VFX — the effects that go with them.
These montages exist per gait: drawing while running is not drawing at a standstill. An empty gait cell reuses the standstill one.
The moment the character actually swaps weapon is marked in the montage itself, by a notify placed on the frame where the hand closes on it. Without a notify, the swap happens at the very start of the montage.
Aiming
Add an aim creates a sub-row under the weapon, with its own cell. It is the same weapon, in another state.
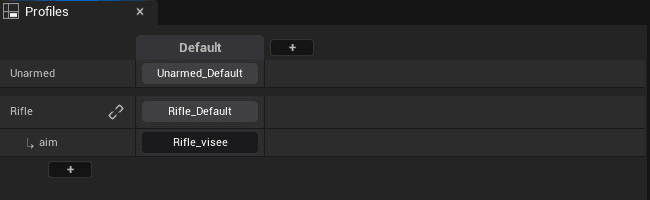
Aiming is authored in a single cell, in the Any tab. That is on purpose: aiming is a pose, not a locomotion. It layers over whatever the character is already doing — walking, running, jumping — without replacing it.
| Setting | What it does |
|---|---|
| Aim Interp Speed | How fast the torso follows the camera. Higher and it sticks; lower and it lags behind. |
| Aim Mode Blend Time | The length of the blend when the aiming pose changes. |
| Aiming Forces Strafe | While aiming, the character faces the camera. Untick it so it aims while keeping its running direction. |
The order of the layers
- 1The stance provides the legs and the movement.
- 2The weapon adds its poses on top.
- 3Aiming adds its own on top of that again.
Each storey only adds what it genuinely brings. That is why adding a weapon does not force you to re-author a whole locomotion — and why a setting that seems to have no effect on a weapon often comes from the storey below.
Body Layer: the body layers
Body Layer adds poses on top of the locomotion: breathing after a run, an injured shoulder, a clenched hand. These things have no place inside a run cycle — they must be able to arrive during any cycle, and leave again. Several layers stack.
| Setting | What it does |
|---|---|
| Mode | Where the pose comes from: a clip, a blend space, or nothing. |
| Blend | Additive: the animation adds onto the locomotion, and needs an additive clip. Replace: the covered bones take the pose, and need a normal clip. |
| Branch Filters | The bones this layer plays on. |
| Driven By | What drives the layer: the effort computed by the plugin, or a value sent by your game. |
| Rise Time | How long the layer takes to rise to full. |
| Fall Time | How long it takes to fall back to zero. This is what lets the character catch its breath after running. |
| Weight | The layer’s weight when its driver is at maximum. |
| Weight At 0 | Its weight when the driver is at zero. Around 0.3 for breathing that carries on at a standstill. |
| Play Rate | The playback speed. At 0, the layer holds a single pose: the one at Start Position. |
| Max LOD | The level of detail beyond which the layer stops. -1 to never stop it. |
To drive a layer from your game: give it a Custom Name, then call Set Body Layer Input with that name to send it a value. That is how you wire an “injured” layer onto your health bar without the plugin having to know anything about your game.
The Config panel
These settings apply to the whole character, whatever the weapon or the stance. You only touch them once, when setting up.
| Group | What it sets |
|---|---|
| Bones | The bones the plugin uses: the left foot, the right foot. They are used to chain clips without the legs popping, to know which foot a traversal starts on, and for foot IK. |
| Mirror | The skeleton’s mirror table, and Auto-Mirror Missing: when a clip is missing on one side, play the other side’s mirrored. |
| Debug | The diagnostic displays in game. |
| Motion | The optional curves: remaining distance and rotation, when your clips have no root motion. |
| Blends | The blend durations between states. |
| Reface Warp | The rotation correction applied during a reorientation. |
The two bone settings are the most important in the panel: get them wrong and clip chaining pops, and traversal starts on the wrong foot. They are filled in automatically if your skeleton follows Unreal’s naming.
The inputs are already wired
Everything above is set in the editor, without code. This page is for the other half: what your Blueprint can ask of the character. The Locomotion LF component, sitting on the Blueprint created at the start, exposes everything that follows.
The Blueprint created for you already wires the eight actions from the Input folder. You have nothing to do for the character to respond to the gamepad — this table is here so you know where to touch if you want to change something.
| Action | What the Blueprint calls |
|---|---|
| IA_Move | Move — both stick axes, relative to the camera. |
| IA_Look | Look — the camera. |
| IA_Jump | Jump Pressed on press, Jump Released on release. |
| IA_Walk | Set Walk Requested. |
| IA_Sprint | Set Sprint Requested. |
| IA_Strafe | Set Strafe Mode, and Set Strafe Focus / Clear Strafe Focus for the target. |
| IA_Aiming | Set Aiming — true on press, false on release. |
| IA_Equip | Next Weapon — the next weapon among those the player owns. |
These actions are your own copies, in the character’s Input folder. Remap the keys freely: you will never touch the plugin.
What it looks like in the graph
Always the same pattern, and it fits in three nodes: the input action, the component, the function. Movement is the textbook example.
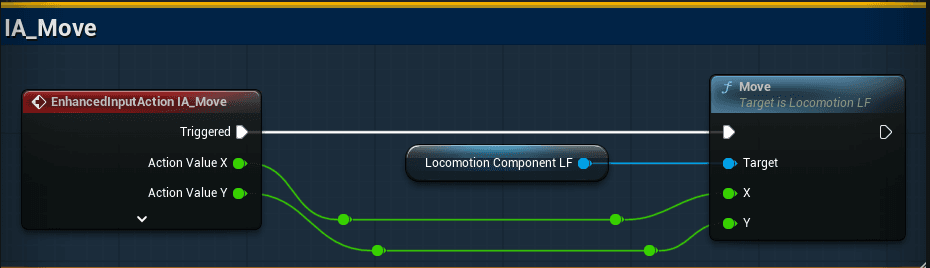
The blue “Locomotion Component LF” node is simply the component dragged in from the component list: that is what you plug into the Target input. You will find it in every one of these graphs.
Some actions need two outputs from the event rather than one. The jump is the typical case: press and release call two different functions.
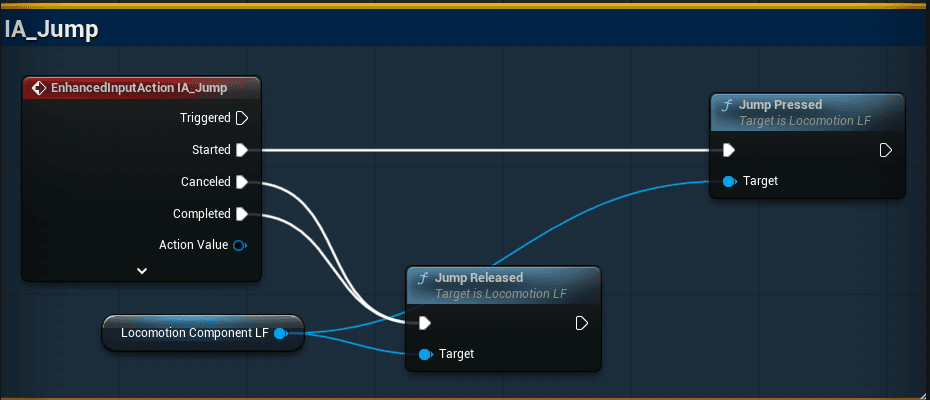
One thing is missing from this picture: on startup, the Blueprint adds its key mapping to the player (Add Mapping Context on Begin Play). Without it, none of these actions fire. The character created for you already does this.
Moving
| Function | What it does |
|---|---|
| Move (X, Y) | Movement. X = right, Y = forward, relative to the camera. |
| Move Arc (X, Y, Turn Rate) | The variant for quadrupeds: instant about-turns are forbidden. The character keeps a forward component and turns around along an arc, like a real animal. |
| Look (X, Y) | The camera. |
| Jump Pressed / Jump Released | The jump. The release matters: it is what makes short hops possible. |
Choosing the gait
| Function | What it does |
|---|---|
| Set Walk Requested (bool) | Requests walking while true. |
| Set Sprint Requested (bool) | Requests sprinting while true. |
| Set Gait (gait) | Forces a gait and applies its speed, bypassing the automatic resolution. |
Strafing
| Function | What it does |
|---|---|
| Set Strafe Mode (bool) | Enters or leaves strafe. |
| Set Strafe Focus (actor) | Gives a target to keep in view. As long as it is valid and strafe is active, the body faces that target instead of following the camera. |
| Clear Strafe Focus | Releases the target. |
| Is Strafing | True if the character is strafing. |
Weapons
| Function | What it does |
|---|---|
| Toggle Weapon (armed, unarmed) | The simplest entry point: draws if the weapon is not active, holsters otherwise. Montages and effects are handled. |
| Equip Weapon (profile) | Equips a specific weapon. |
| Next Weapon (allowed weapons, step) | The next weapon in the cycle. This is how you unlock a weapon mid-game: you configure every weapon in advance, and only pass in the ones the player owns. A step of -1 gives the previous weapon. |
| Set Aiming (bool) | Aims, or stops aiming. |
| Get Active Weapon / Is Aiming | The current state, for your interface. |
Spawning the weapon mesh
The plugin spawns no mesh: it plays the animations and switches profile. Attaching or hiding the weapon remains your job — but it tells you at the right moment.
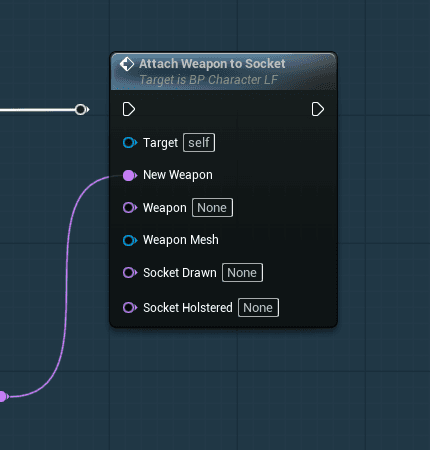
At the bottom of the graph, the input calls Next Weapon: it's one example of a way to switch weapons (mouse wheel, gamepad D-pad), not a requirement — build your own with the functions below. At the top, Bind On Weapon Changed subscribes to the component's On Weapon Changed event. That event directly gives the new weapon's name (New Weapon), which is passed to Attach Weapon to Socket to attach the right mesh.
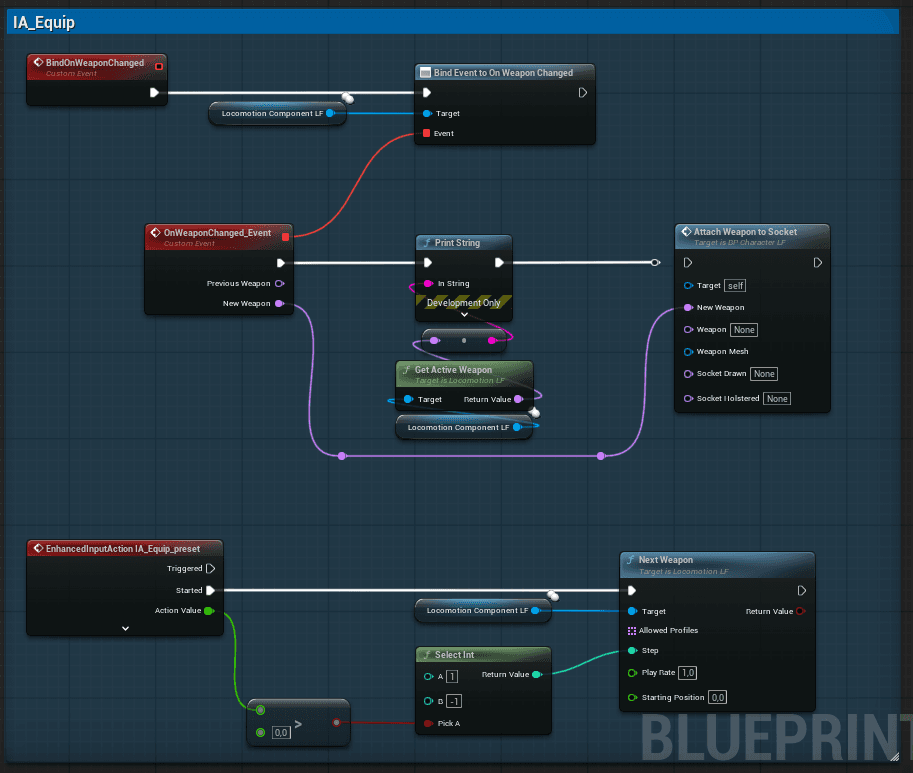
Next Weapon only cycles through a list: with Allowed Profiles = [Pistol, Rifle] and Step = 1, each press moves to the next weapon. It's just one way of doing it among others — the plugin provides several functions to build your own.
Equip Weapon: equipping a specific weapon
To equip a specific weapon instead of cycling through the list — a weapon wheel, one key per weapon — use Equip Weapon. Target Profile is the weapon to equip ("Rifle", for example); leave Unarmed Profile at None so it resolves automatically from the DataAsset.
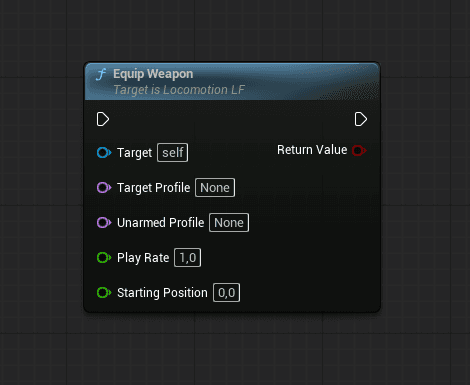
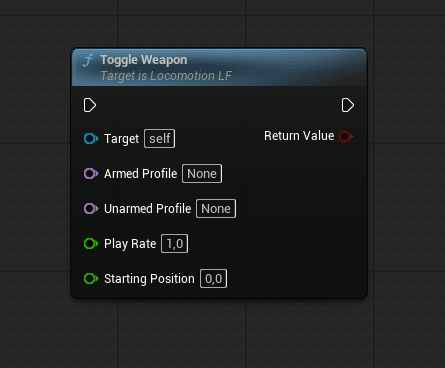
Toggle Weapon: a single draw/sheathe button
For a single button that draws if the weapon is not active and sheathes otherwise, Toggle Weapon is enough: Armed Profile is the weapon, Unarmed Profile stays at None to be resolved automatically.
Attach Weapon to Socket: the ready-made function
In the character created for you, this function does the work. One call per weapon owned is enough to show or stow all of them: Weapon says which weapon this call is for ("Rifle"), Weapon Mesh its mesh. If New Weapon matches Weapon, the mesh goes onto Socket Drawn (in hand); otherwise onto Socket Holstered (stowed on the body). Duplicate the call for each weapon, changing Weapon, Weapon Mesh and the two sockets.
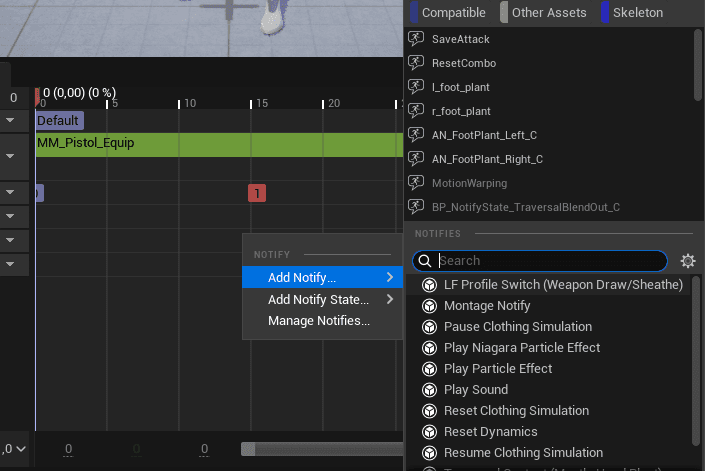
The LF Profile Switch notify: timing the change to the animation
By default, the weapon changes — and On Weapon Changed fires — as soon as the draw or sheathe montage starts. To time that change to the frame where the hand closes on the weapon, place the LF Profile Switch (Weapon Draw/Sheathe) notify on the montage, at the frame you want: the change then waits for that notify instead of firing immediately. Without that notify on the montage — or without a montage at all — the change stays immediate.
Waiting for a draw to finish
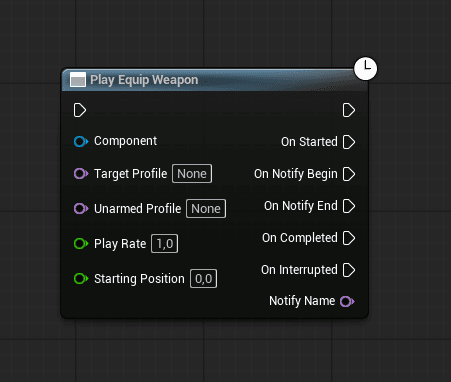
Play Equip Weapon was created for people used to Play Montage who'd rather not go through the specialised functions (Equip Weapon, Toggle Weapon): it draws, sheathes or swaps weapon exactly like they do, but with the same outputs as a Play Montage — On Started, On Notify Begin, On Notify End, On Completed, On Interrupted.
Stances: crouched, flying, whatever you want
A stance is a column in the profile table. You create as many as you want — crouched, injured, flying — and switch to them from the Blueprint:
| Function | What it does |
|---|---|
| Set Axis State (axis, value) | Sets the value of an axis. The default axis is “Posture”; the value is the column name, for instance “Crouch”. An empty value clears the axis and returns to the default stance. |
| Get Axis State (axis) | The current value of that axis. |
| Set Locomotion Profile (name) | Switches straight to a profile by name. |
| Get Active Profile Name | The active profile. |
The switch is not abrupt: the new combination’s animations are loaded in the background, and the character only switches once they are ready. In the meantime, it carries on playing what it was playing.
Example: the Crouch stance
Setting the axis only changes the pose being played: the collision capsule belongs to Unreal, not the plugin. So the Blueprint calls two things one after the other: Set Axis State (“Posture”, your column’s name — for instance “Crouch”) for the pose, then Crouch / UnCrouch, the character’s native functions, so the capsule actually changes size.
The character created for you already wires this example on IA_Crouch: a Flip Flop alternates between the two branches on each press. The first calls Set Axis State with the name of the profile created in the Profiles tab ("Crouch", for example), then Crouch; the second calls Set Axis State with the value left at None — to return to the default stance — then UnCrouch.
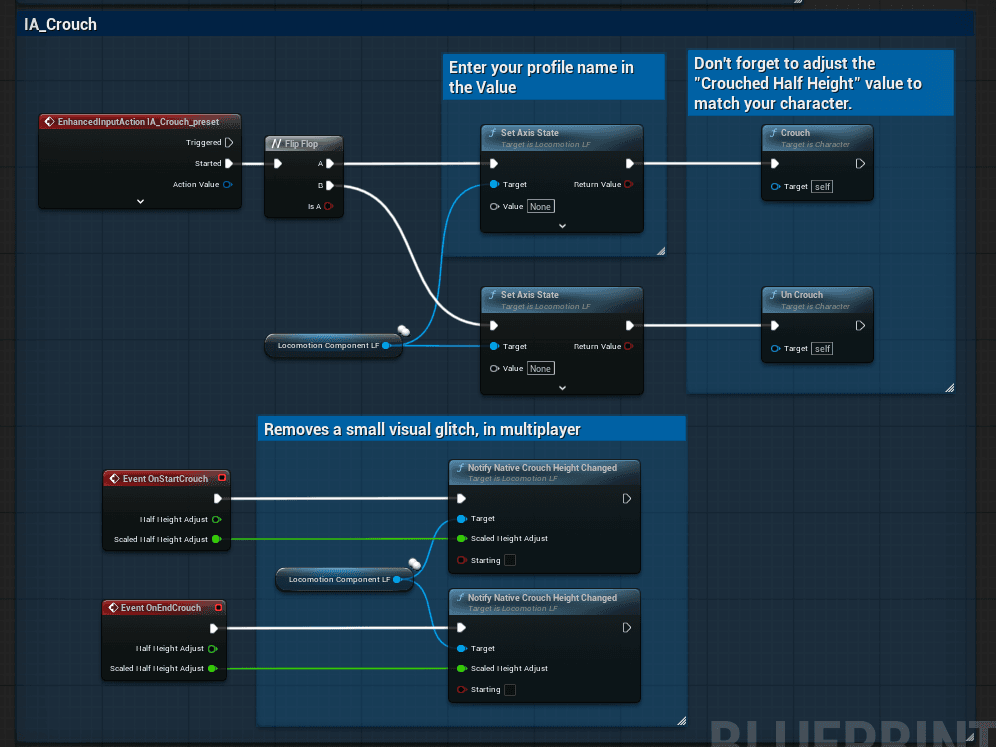
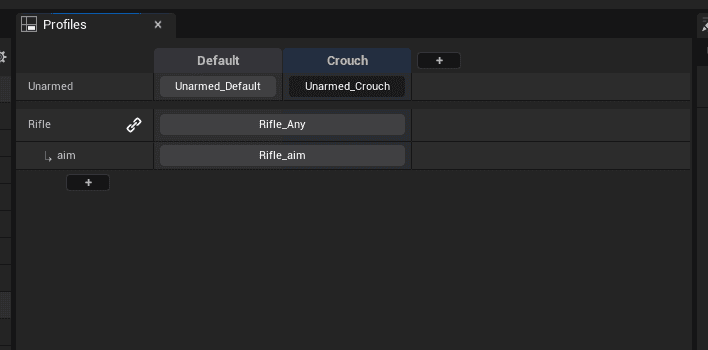
The name passed to Set Axis State must exist as a column in the Profiles table (Profiles tab) — that is where you add it, with the + at the top.
Don’t forget to adjust Crouched Half Height — a native Unreal setting (Character Movement, on your Blueprint) — to your character’s actual crouched height. A value that doesn’t match your animations makes the character float or sink its feet into the ground.
In multiplayer, a character you don’t control can jump slightly right at the moment it crouches or stands up. To avoid it, wire Notify Native Crouch Height Changed to the character’s native Event On Start Crouch and Event On End Crouch, connecting their Scaled Height Adjust output — leave Starting set to false in both cases.
Driving a Body Layer
| Function | What it does |
|---|---|
| Set Body Layer Input (name, value) | Gives a layer set to “Custom” the value only your game knows: health for an injury, temperature for a shiver. The name must be exactly the layer’s “Custom Name”, and the value runs from 0 to 1. |
| Get Body Layer Input (name) | The current value. |
Inside the Animation Blueprint
Two nodes are available on the animation side, if you add your own layers after the plugin’s.
| Node | What it gives |
|---|---|
| LF Locomotion State | The full locomotion state: speed, gait, strafe, angles. Pull the property you want and plug it into the pin you need to drive — that is how a Stride Warping node finds its Locomotion Speed. |
| LF Foot Placement Alpha | A value between 0 and 1, to plug straight into the Alpha of your Foot Placement — and of your Leg IK. It is 1 in normal locomotion and falls towards 0 during a traversal, while the plugin itself holds a foot against the wall (the more engaged of the two feet decides). Nothing to invert: without it, your ground placement and the plugin’s fight over the foot, which jitters against the obstacle. It stays at 1 if Use Foot IK is unticked in Config. |